Runnel — User Guide
Production management for crew staffing, paperwork, and call sheets — from first booking to final wrap.
By the SOUN Media production team — we built Runnel to run our own shoots, then opened it up. Last updated August 2026.
This guide walks a producer or coordinator through everything Runnel does: building crew, sending deal memos & NDAs, collecting W‑9s and payment info, publishing call sheets, and closing out a shoot. Screenshots are from a sample workspace ("Northwind Studios") so the data is illustrative.
Table of Contents
- Getting Started
- Navigation
- The Dashboard
- Crew Directory
- Talent
- Inside a Project — Overview
- Staffing: the Crew Board
- Sending Paperwork — Deal Memo, NDA & W‑9
- Financials & Wrap
- Call Sheets
- Finances (Across Projects)
- Settings & Templates
- The End‑to‑End Workflow
- Reference
- Troubleshooting
Getting Started
Accessing Runnel
- URL: your Runnel workspace (e.g.
https://getrunnel.com) - Browsers: Chrome, Safari, Firefox, Edge
- Mobile: fully responsive — add it to your phone's home screen to use it like an app
Signing In
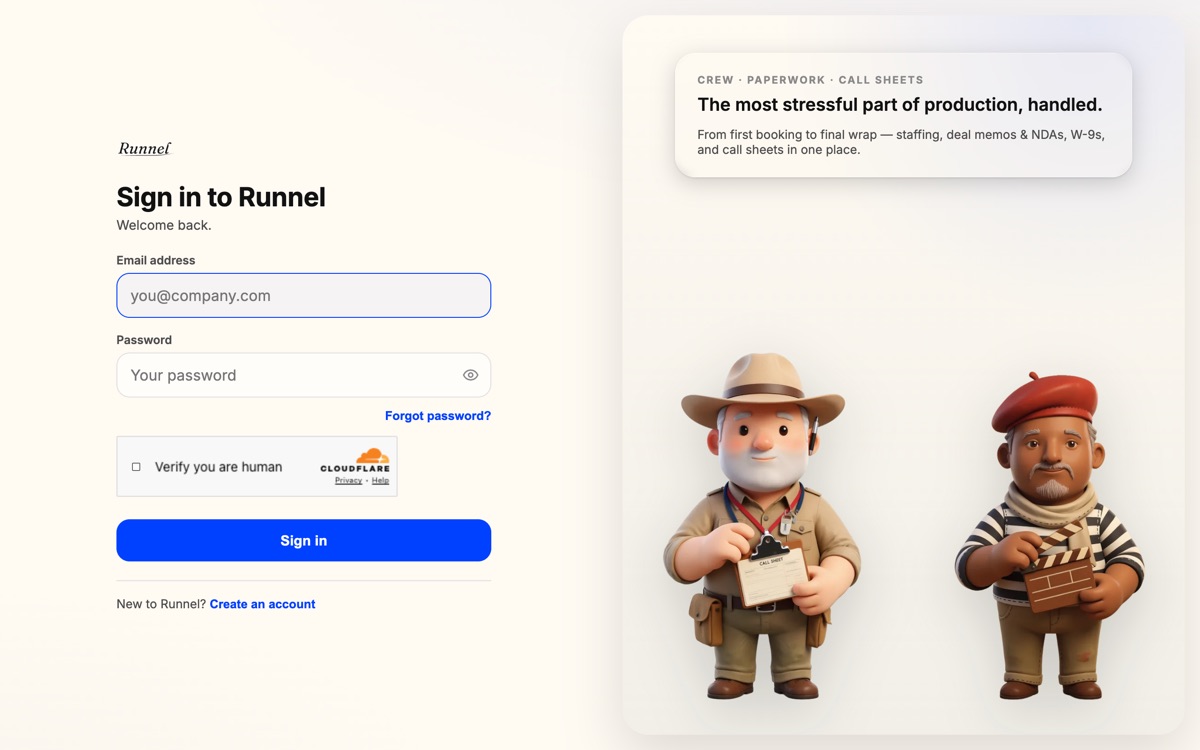
- Enter your email and password.
- Complete the "Verify you are human" check (Cloudflare Turnstile — usually one click, often automatic).
- Click Sign in.
New to Runnel? Use Create an account. Forgot your password? Use Forgot password? — you'll get a neutral "if an account exists, a reset link is on its way" message and a reset email.
Tip: The human‑check is bot protection. If it ever shows a puzzle, solve it once and you're in — it won't slow down normal logins.
Your First 5 Minutes
- Finish workspace setup (Settings) — set your production company legal name and your deal‑memo / NDA templates. This unlocks sending paperwork.
- Create your first project from the dashboard.
- Add roles and crew, book someone, and send their deal memo + NDA.
Navigation
The top bar is your home base on every screen:
| Item | Where it takes you |
|---|---|
| Workspace switcher (top‑left) | Switch between workspaces you belong to |
| Crew | Your reusable crew/contact directory |
| Talent | Your actor/model roster |
| Finances | Money across all your projects |
| Settings | Company name, templates, Drive, members |
| Sign out | Log out (red exit icon on mobile) |
Tip: On mobile the nav collapses — Settings becomes a gear icon and Sign out a red exit icon, all on one line.
The Dashboard
Your landing page: workspace summary and every project.
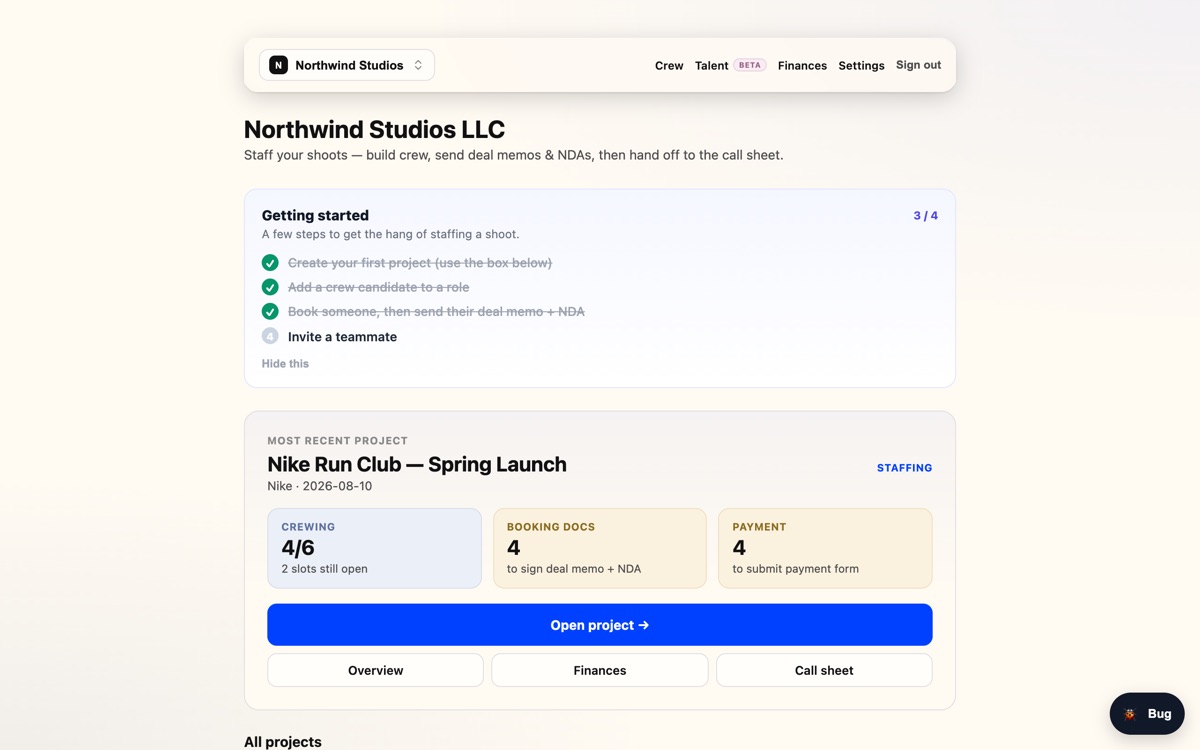
What You'll See
- Getting started checklist (dismissible once you're up to speed).
- Most recent project card with three at‑a‑glance stats:
- CREWING — roles filled vs. open (e.g.
4/6 · 2 slots still open) - CREW — how many crew still need to sign their deal memo + NDA
- PAYMENT — how many still need to submit their W‑9 + payment form
- CREWING — roles filled vs. open (e.g.
- All projects list, and a form to create a new one.
How To: Create a Project
- Scroll to the new‑project form (or "Create your first project").
- Enter a project name and optional client.
- Set the Starts date and number of days (use the − / + stepper).
- Optionally add a short description (shown to booked crew).
- Click Create — you'll land on the new project.
Tip: The three status pills on each project card are your daily worklist — chase the "to sign" and "to submit payment" counts to get everyone's paperwork in.
Crew Directory
A reusable roster of the people you work with, independent of any one project.
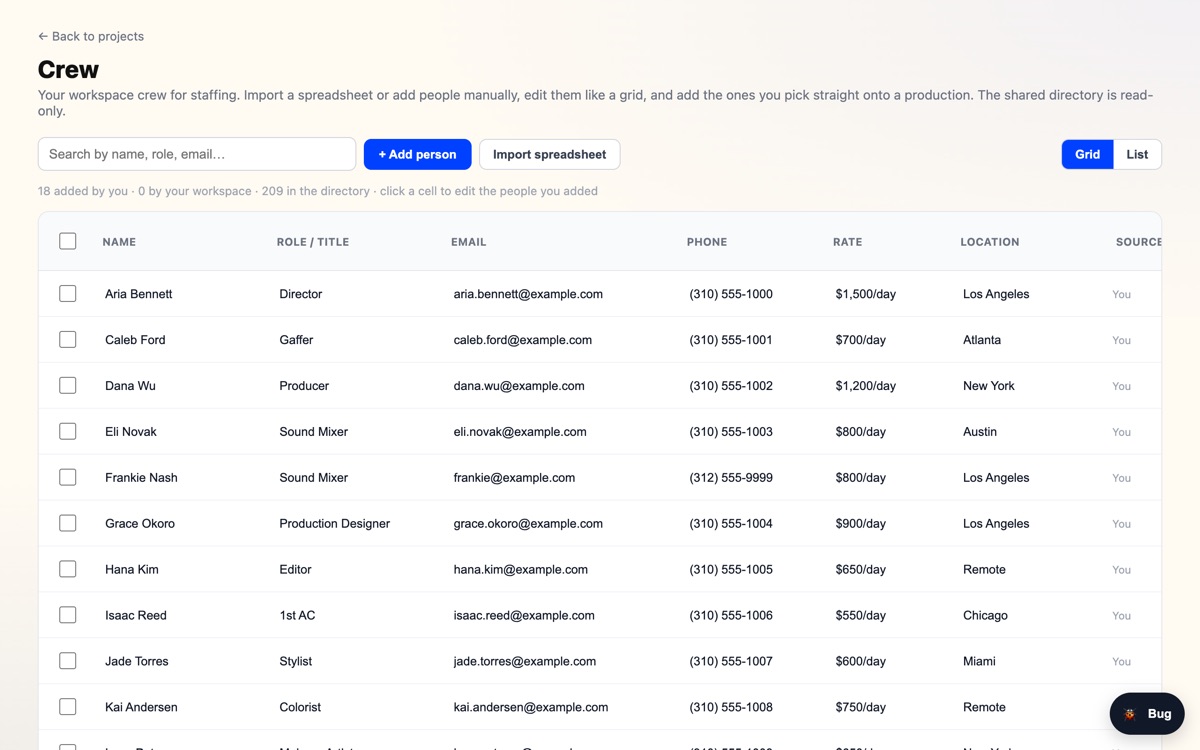
What You'll See
Your saved contacts with name, role, department, rate, phone, email, location, and their website + Instagram — in a spreadsheet‑style Grid view (great on desktop) or a List view (default on mobile). Website and Instagram are optional; add them here or in a crew member's details on a project.
What You Can Do
- Add a contact, or import several at once.
- Edit inline in the grid (changes save automatically).
- Select people and add them to a project in bulk.
Tip: Contacts you own are yours to edit; the directory is shared across your workspace so the whole team pulls from the same list.
Talent
A separate roster for actors and models (distinct from crew).
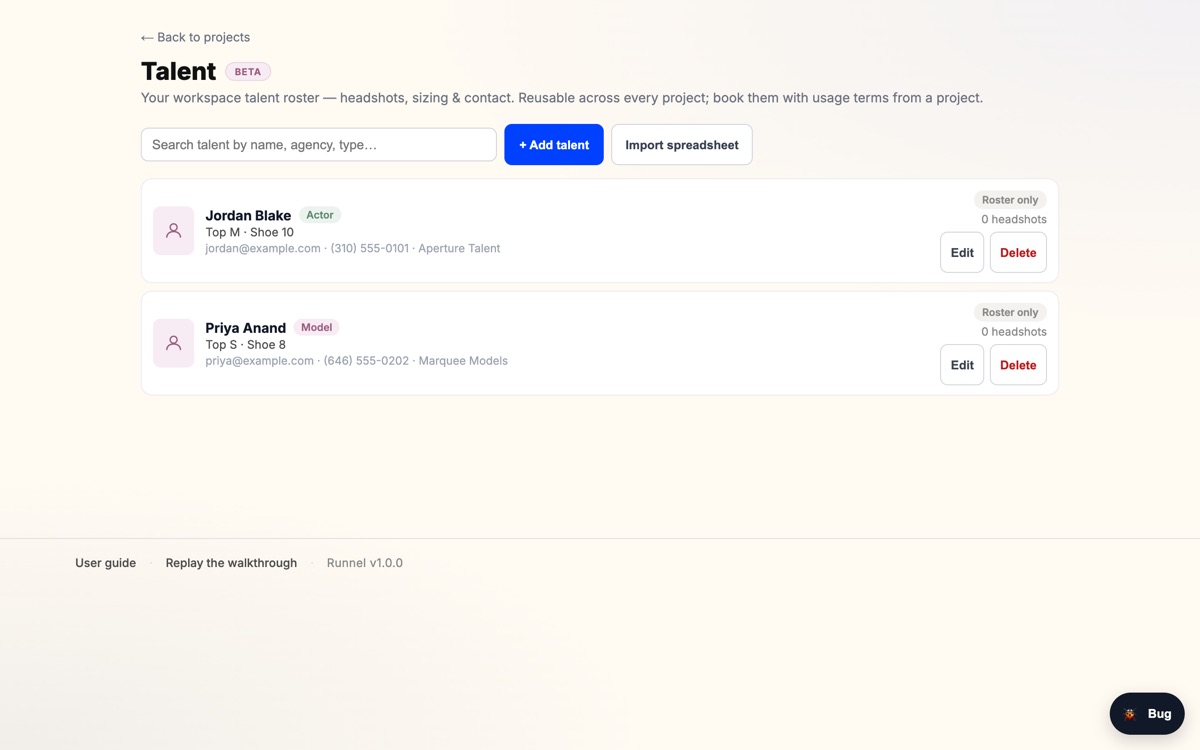
What You'll See
Your talent list with type (actor/model), agency, and contact details. When you first add someone to the roster you can upload their headshots (up to 5) right there — on the web or the mobile app. Talent has its own booking, release/NDA, sizing ("skins") sheet, and wrap paperwork — kept separate from crew so PII and usage/buyout terms are handled correctly.
How Talent Flows Through a Project
- Book — from the project's Talent panel, add someone from the roster and set their terms: the part, recognizable/unrecognizable, speaking/non‑speaking, the fee (hourly, daily, or flat — the same rate shape as crew, so it totals on Financials the same way), and the usage/buyout term. Booking drops them straight onto any call sheet that already exists for the days they work. Un‑book sends them back to "considering" and keeps the terms; × removes them from the project entirely. Either way they come off the call sheets.
- Release + NDA — sent the same way as a crew deal memo (email, or copy a link). When they sign, they also confirm their own sizing on the same page; it writes back to the roster and the skins sheet shows a ✓ confirmed mark next to their name (an ○ unconfirmed mark means production typed the sizes in and the talent hasn't checked them yet).
- Minors — if the date of birth makes someone under 18, the roster needs a guardian name and email before a release can go out. The release, every reminder, the verification code and the signed receipt all go to the guardian, who co‑signs alongside the talent. The Talent panel flags a minor with no guardian on file.
- Wrap — the W‑9 + payment request is the very same form crew fill in, with the same reminders, reopen and Drive filing. Talent who are working unpaid never get a W‑9 request.
Tip: On a multi‑day shoot, each booked talent gets day chips (D1/D2/D3) to set which days they work — this scopes both the call sheet (which days they're added to) and the "booked but missing" check so a talent is only flagged on the days they're actually needed. The project Overview queue counts outstanding talent releases and payment forms alongside crew, and its Chase signatures / Send reminder buttons nudge talent too.
Inside a Project — Overview
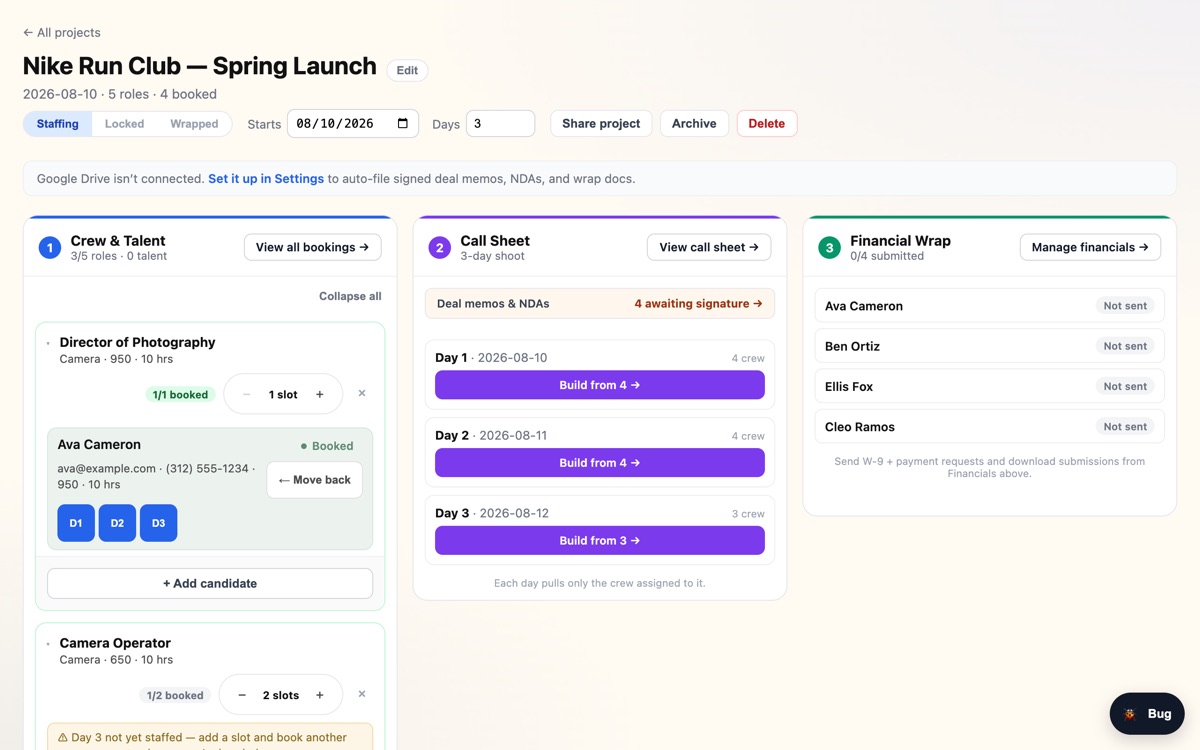
Open any project to land on its command center — a page organized around what's blocking the shoot, with tabs (Overview · Crew · Talent · Locations · Call sheet · Wrap, and History on the right) leading to each full workspace.
What You'll See
- Needs attention — a queue of what's actually blocking the shoot: open slots, outstanding deal‑memo/NDA signatures, missing W‑9 + payment forms, and (on multi‑day shoots) day‑coverage gaps. Rows disappear as they hit zero, and each has a one‑click action: Review candidates, Chase signatures (emails a reminder to everyone with an unsigned packet), Send reminder (same, for payment forms).
- Crew grid — every role grouped by department, one line per slot: booked people show a name and a green ✓, open slots show + Add, and a promising candidate shows Book →. Click a booked person to open their details drawer (status, deal memo/NDA, W‑9, brief — everything about them lives there). The quiet Edit on a department card lets you set a role's standard rate, hours and headcount, or delete it.
- Creative brief — upload the brief and send it to your crew, with versions and a send log (next section).
- Sidebar — the project at a glance: description, start date and days (click to edit), the status pill (Staffing → Locked → Wrapped), a crewed progress bar, a Files card (Google Drive folder + current brief), Share project, and Archive (admins).
How To: Add a Role and Crew
- Click + Add a role (top right of the crew grid) and pick a role — or open a department card's Edit to adjust headcount on an existing one.
- On an open slot, click + Add and pick someone from your directory (or quick‑add).
- When a candidate says yes, click Book → right on their row.
- For pipeline work beyond booking — statuses, reordering, day chips (D1/D2/D3) — open the Crew tab (the full board).
Tip: On a multi‑day shoot, "day‑coverage gaps" in Needs attention names exactly which roles are missing which days.
The Creative Brief
The brief panel keeps one confidential document per project, with a version label on every upload and a log of every send.
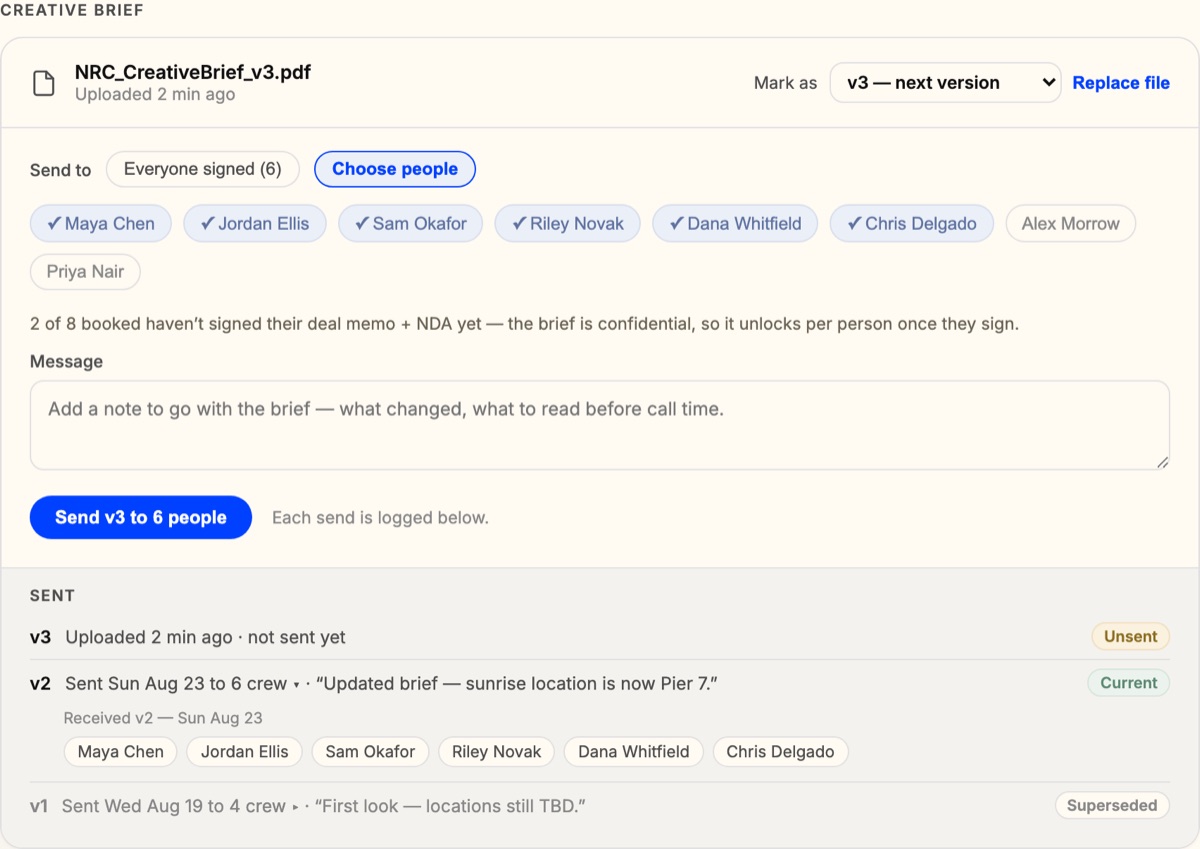
- Upload (or Replace file). Each upload is automatically marked as the next version — use Mark as to re‑label it (replace the current version, or a custom label).
- Pick recipients: Everyone signed, or Choose people to toggle name chips. The brief is confidential, so it only unlocks for crew who have signed their deal memo + NDA — anyone who hasn't shows as an unselectable gray chip until they sign.
- Add an optional message ("what changed, what to read before call time") — it rides along in the email.
- Send. Each recipient gets a private, personal link. Every send lands in the SENT log below: the version, the date, your message, and exactly who received it (click the recipient count to expand). Pills mark the current state — Unsent, Current, Superseded.
Heads‑up: Versions are labels over a single stored file — replacing the file updates what every link opens, and the log records who was sent which version at the time.
Staffing: the Crew Board
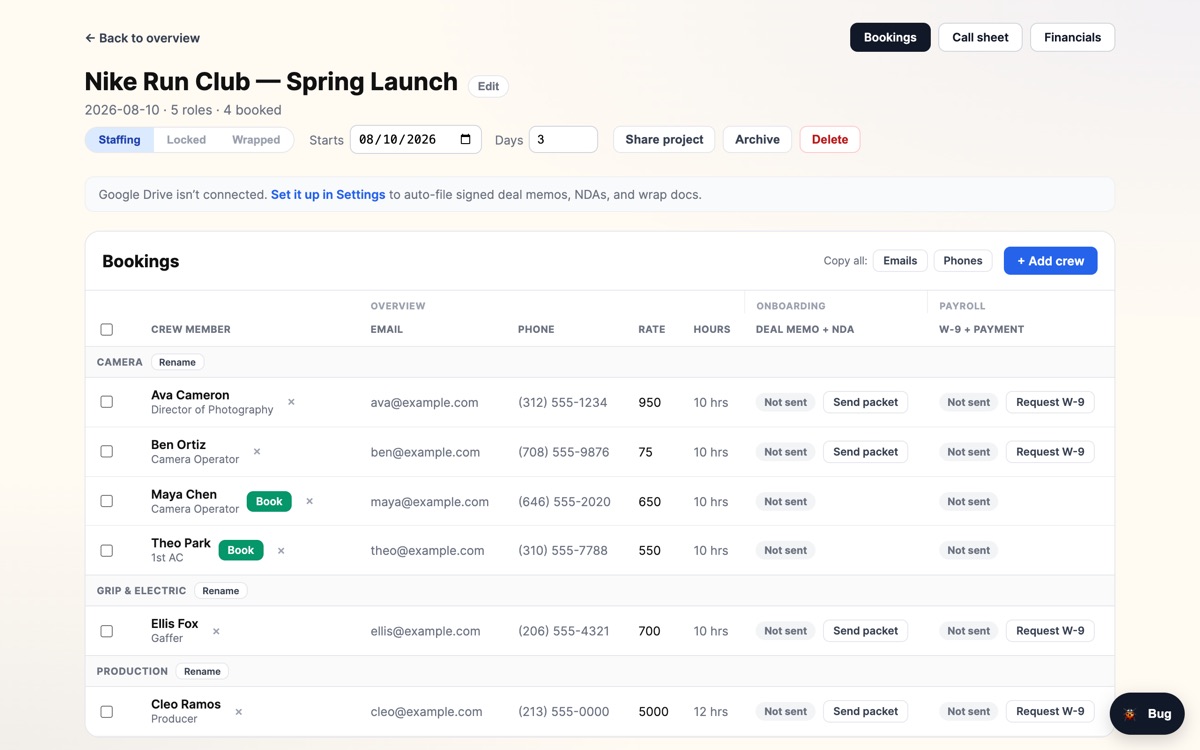
A focused board for moving people through your pipeline.
What You'll See
Every role grouped by department, each candidate with their status — considering, contacted, available, booked — plus quick actions to Book, remove, Send packet (deal memo + NDA), and Request W‑9.
Tip: When the shoot wraps, Copy credits (top of the board) builds a ready‑to‑paste crew list — grouped by department, as Role — Name (@instagram) — for your wrap post or the end of the video. It opens an editable preview so you can tweak before copying.
How To: Book Someone
- Find the candidate under their role.
- Click Book — they move to Booked.
- Booking can automatically send their deal memo + NDA (if auto‑send is on), or you can send it yourself from their details.
Tip: On mobile the board becomes tap‑friendly cards; on desktop it's a dense table.
Sending Paperwork — Deal Memo, NDA & W‑9
This is the heart of Runnel. Each booked crew member gets two paperwork tracks, both reached by opening a crew member's details (click their card, then Open details):
Onboarding tab — Deal Memo + NDA ("booking packet")
- Click Send documents to sign. Runnel first shows a short confirm screen with the two things that get frozen into the memo — the rate type (Hourly / Day rate / All‑in), the rate, and the payment terms — all editable right there. What you see is exactly what they'll sign. Confirm, and the secure signing link is emailed.
- Prefer to share the link yourself? Click Create link — it creates the same signing link without emailing, so you can send it via text/Slack.
- Status moves Not sent → Awaiting → Signed. Once signed, the combined PDF (deal memo + NDA + signature record) is downloadable, along with a Certificate — the audit record of the signature (signer, timestamp, IP, document hash).
Tip: Set the rate type deliberately. "2500" on a memo means something very different as a day rate than as an all‑in fee, and the type you pick here is what the crew member sees and signs.
Send an NDA before booking
Sometimes you need an NDA signed during consideration — before you commit to booking someone — so you can safely share a confidential script or creative deck. Runnel lets the NDA travel on its own, separate from the deal memo:
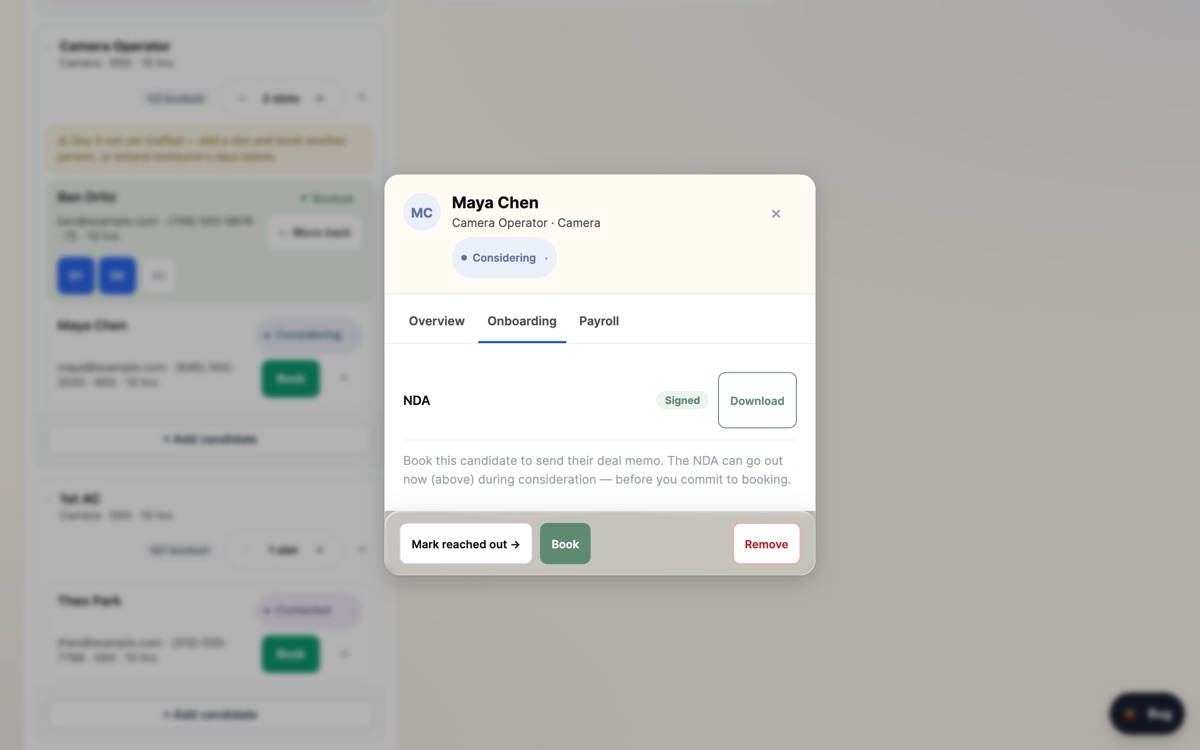
- Open any candidate's details (booked or not) → Onboarding tab → the NDA row.
- Click Send NDA to email them a standalone signing link, or Create NDA link to share it yourself.
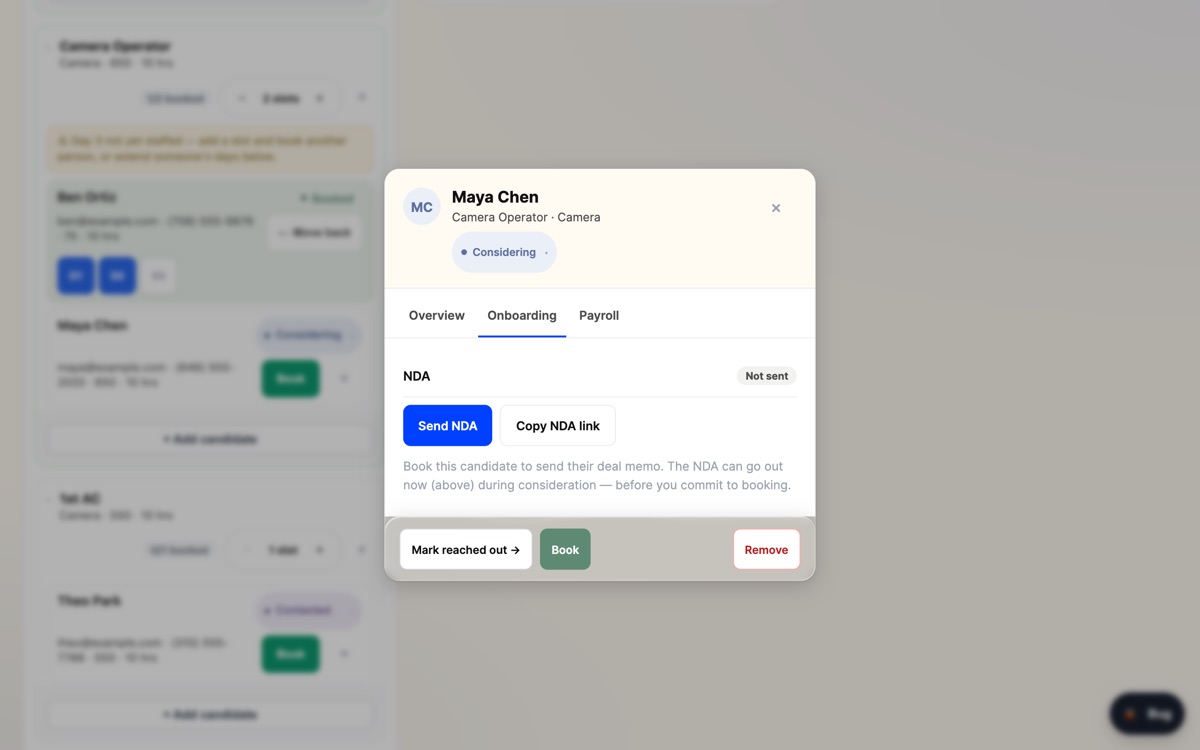
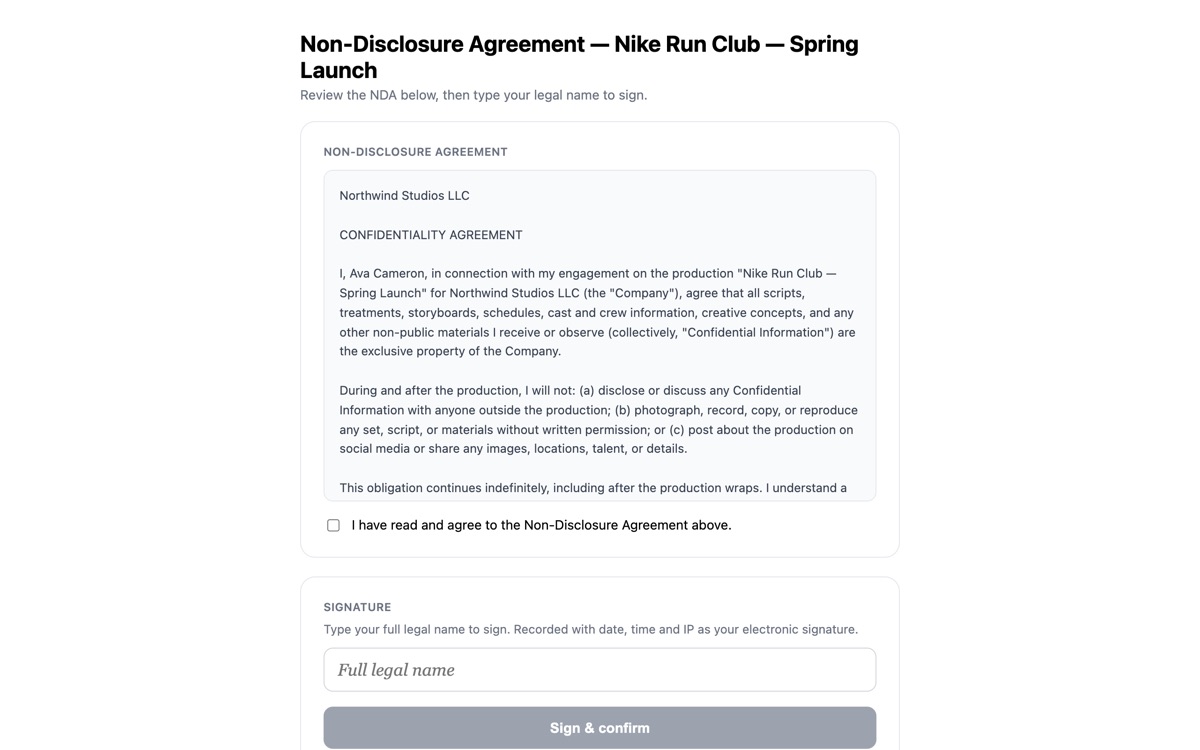
- They open the link and sign the NDA on its own page — read it, type their legal name, tick "I agree". No booking terms required. The NDA row moves Not sent → Awaiting → Signed.
- Once it's Signed, a Download link appears on the NDA row — a PDF of the agreement plus the signature record (name, date, IP). (Admins/owners only.)
- When you later book that person and send their booking packet, Runnel sees the NDA is already signed and leaves it out of the packet, so they only sign the deal memo — never the same NDA twice.
If a candidate has no standalone NDA yet, their booking packet still bundles the NDA as before — nothing changes for the normal flow.
Tip: Sending an NDA needs your production company legal name and a saved NDA template (both in Settings). There's no default NDA — it must be your own language.
Payroll tab — W‑9 + Payment Form
- Click Send W‑9 & payment form (or Create link to share manually).
- The first time you send one, Runnel may ask for your company address. The payment form prints a "bill to" so crew know where to send their invoice — if you haven't set one, this is where it asks. Enter it once and it's saved for the whole workspace; you can also Skip for now and send without it.
- The crew member completes a W‑9 and payment details behind a one‑time email verification code; sensitive fields are encrypted at rest.
- Status moves to Submitted, and you can download the combined document.
Not being paid? No W‑9. Anyone booked with no rate (their own or the role's) is flagged Not paid · no W‑9 needed instead of Not sent: Request all skips them, the Overview queue doesn't count them as a missing payment form, and the Financials tally only counts people with money on the line. You can still Send anyway — Runnel asks you to confirm first.
You can see these statuses roll up everywhere: the project Overview’s Needs‑attention queue shows "4 signatures outstanding", and Financial Wrap shows each person's W‑9 as Not sent / Awaiting / Submitted.
Tip: You must set your production company legal name (Settings) before you can send a deal memo — it's printed on the memo.
Tip: Changing a project's payment terms after memos went out? Runnel warns you which already‑sent memos to resend so crew sign the current version.
What Your Crew Receives
Everything you send goes out as a secure, mobile‑friendly link — your crew never need an account, a password, or the Runnel app. They tap the link, review, and sign or submit. Here's exactly what lands on their screen.
The NDA
Sent on its own (before booking) or bundled with the deal memo. They read the agreement, tick "I agree", and type their legal name — recorded with date, time and IP as an electronic signature.
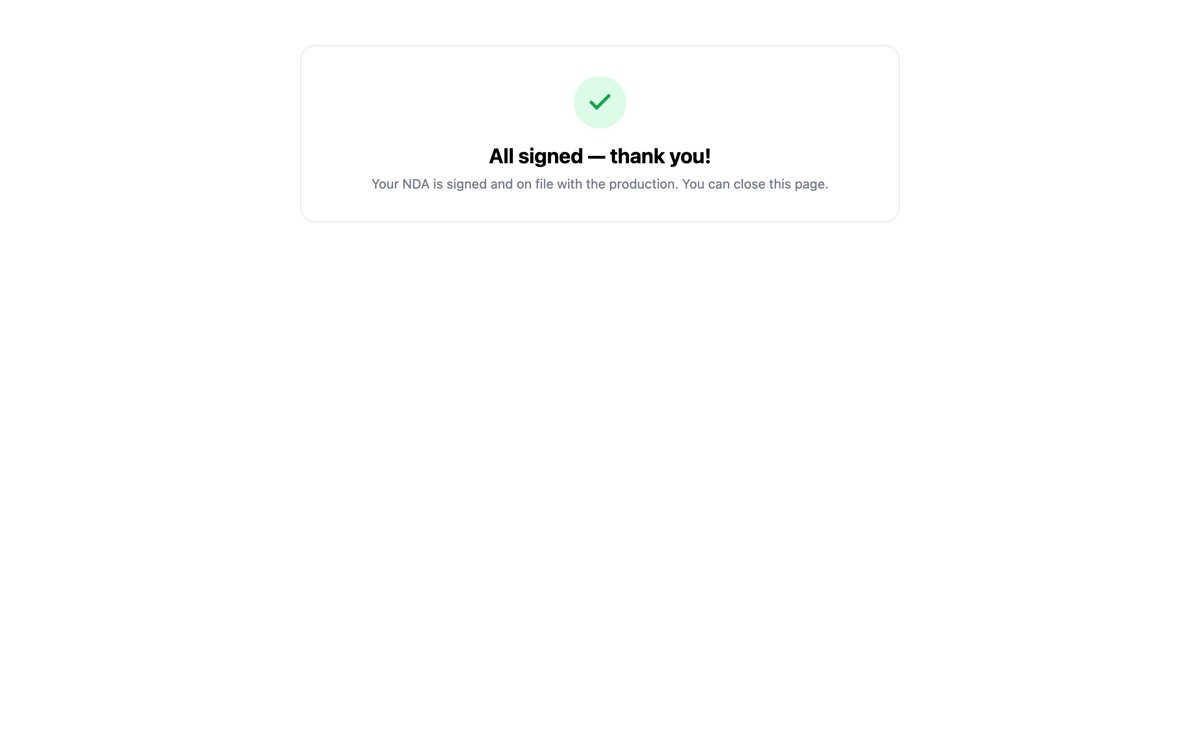
When they're done, they get a clear confirmation — and revisiting the link later shows the same "already signed" state, so there's no confusion about whether it went through.
The deal memo
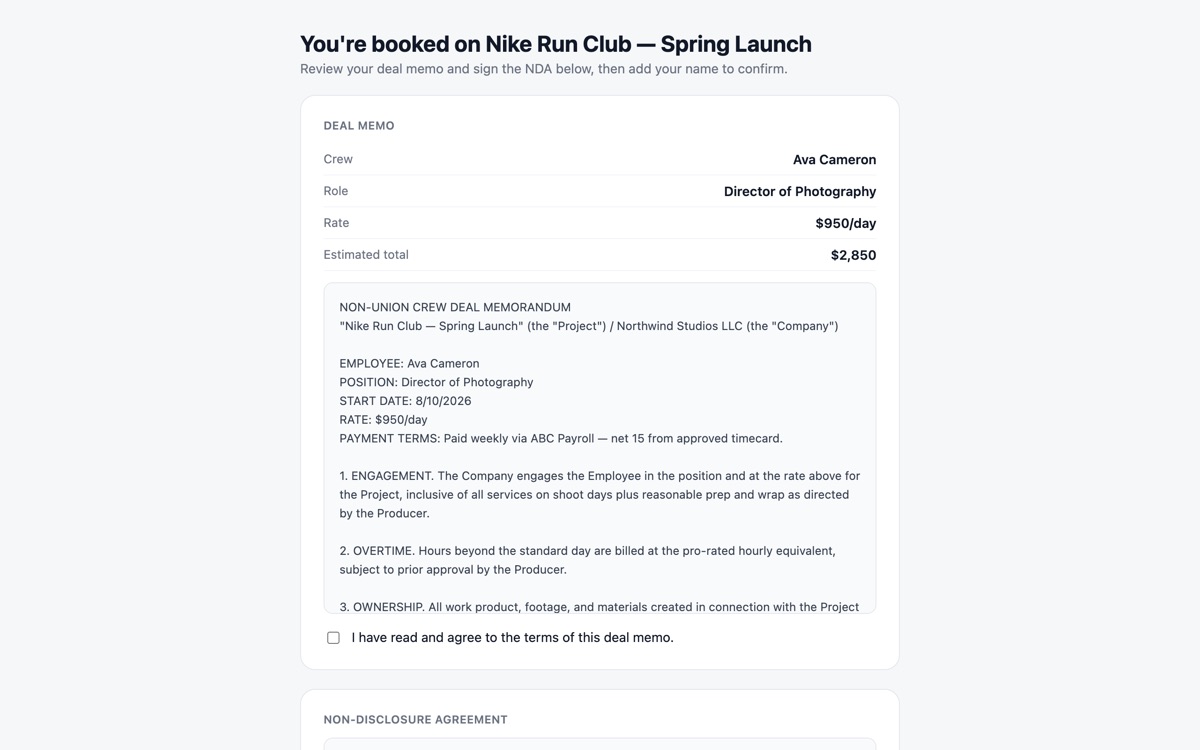
Once booked, they get a "You're booked on …" page: a plain‑English summary of the engagement (role, rate, estimated total) followed by the full deal‑memo document and — if it wasn't already signed separately — the NDA. One name, one set of checkboxes, done.
The W‑9 + payment form
The payment link opens a guided Form W‑9 (name, tax classification, address, TIN) followed by their payment details, with your bill‑to entity shown up top. Sensitive fields (SSN/TIN, bank) are encrypted, and the W‑9 is locked with a one‑time email code before it's submitted — so the signature authenticates the specific payee.
A few things are handled for them so there's less to get wrong:
- The payment form number and date are generated automatically and shown read‑only — no inventing invoice numbers.
- Direct deposit (ACH) is required; for a backup method, Zelle is the recommended option.
- Their labor line is pre‑filled from the booking, so they usually only add kit rentals, reimbursements, and receipts.
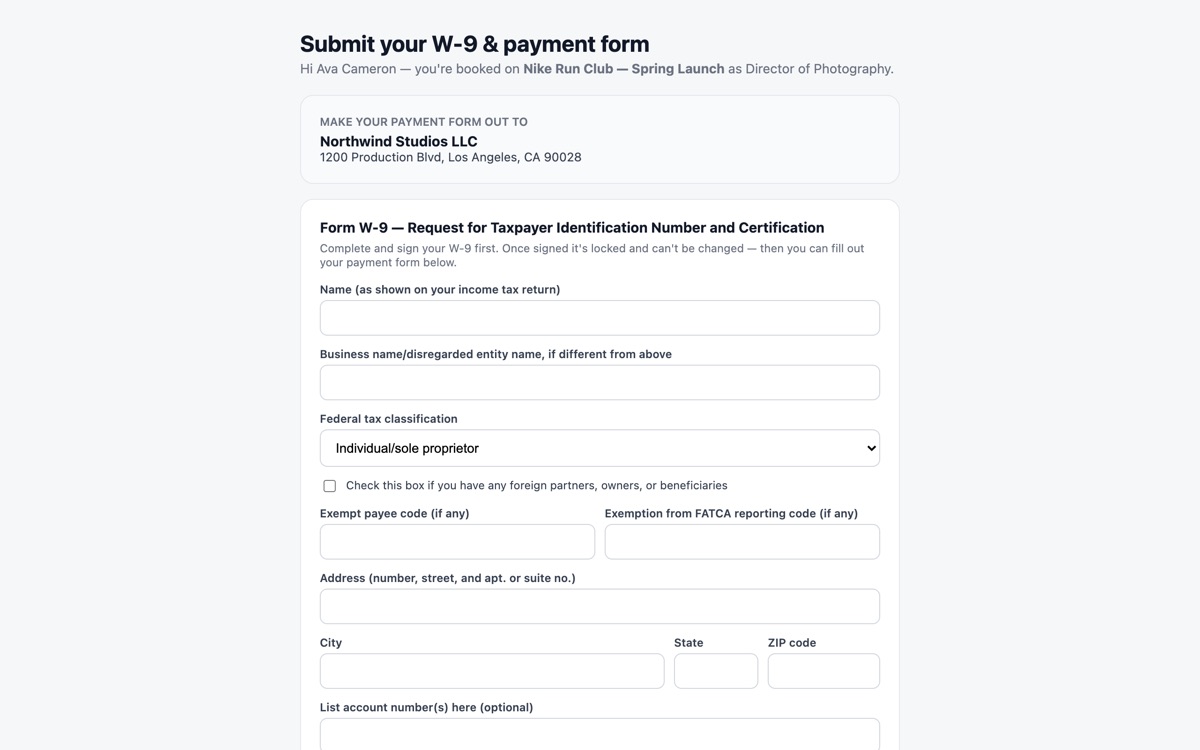
Tip: Every one of these links is single‑purpose and expiring. Nothing a crew member submits is visible to other crew — only you (and admins) can see it, and the sensitive parts are encrypted at rest.
Financials & Wrap
Everything about paying a project's crew.
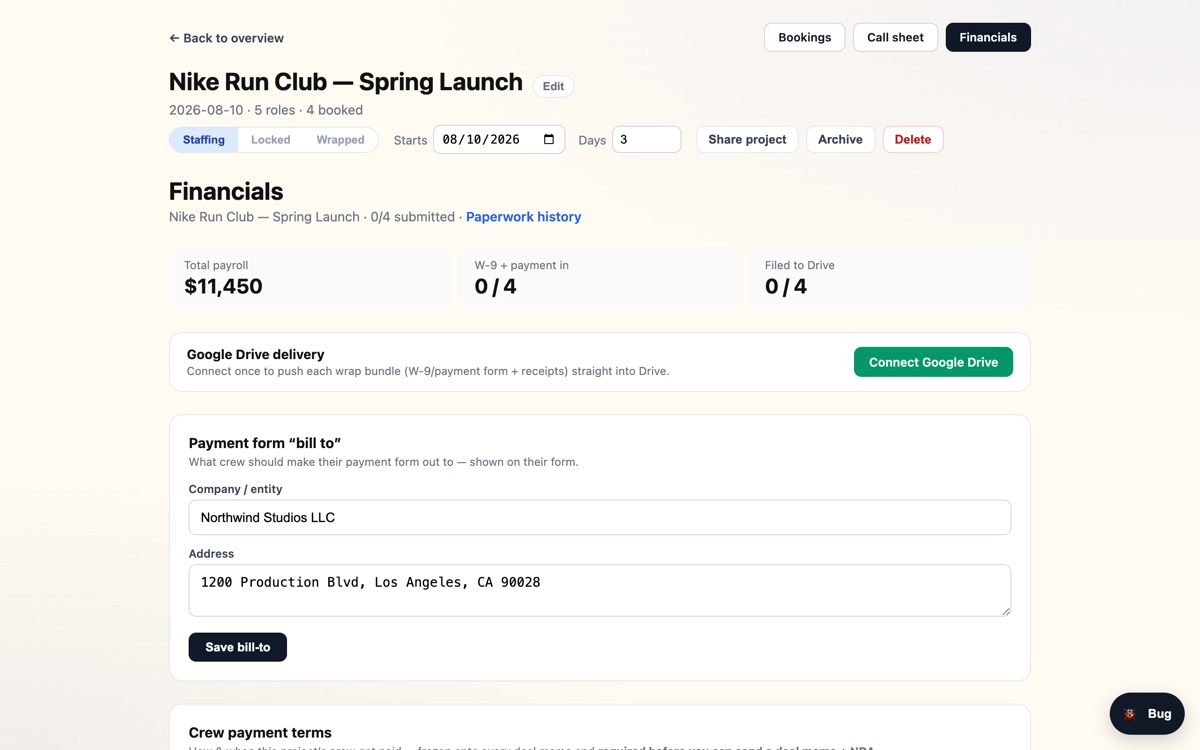
What You'll See & Do
- Crew payment terms (admin) — how & when this project's crew get paid; frozen onto every deal memo and required before you can send one.
- Payment form "bill‑to" (admin) — the entity crew invoice against, printed on their payment form. Leave it blank and Runnel uses your production company name + address (set with the booking‑doc templates on the Crew page), so most projects need nothing here.
- Auto‑reminder settings — cadence and cap for nudging crew who haven't submitted.
- Per‑crew W‑9 / payment requests — send, remind, download submissions, and (admins) securely purge sensitive data after delivery.
- Add / edit the rate in place — a crew member (or talent) whose rate was never entered on the Crew tab shows No rate set with an Add rate link right on their Financials row; enter it there (plus hours, for hourly rows) and the gross, the Not paid flag and the W‑9 request button update on the spot. Edit rate does the same for a rate that's already set.
- Mark paid — a Paid toggle on each crew member for when the money has actually gone out. It's separate from their W‑9/payment‑form submission, and it syncs live to your team.
- Export cost report (CSV) — download this project's booked‑crew line items (department, role, rate, days, gross) to import into a budgeting/accounting tool or a spreadsheet.
- Gross is computed from each person's rate, mode (daily / hourly / flat), and the days they actually worked.
Tip: Connect Google Drive (Settings) to auto‑file every signed deal memo, NDA, and wrap document into per‑person folders. The Google Drive delivery card (and the Drive line on the project header, the Overview Files card, and Settings) always spells out whose account the files are created in — the connected Google address, who connected it and when — and the exact folder path they land in (e.g. My Drive › Runnel Deliveries › Project › person), with an Open in Drive link once the folder exists. Only the project's creator (or the workspace owner) can choose or change a project's folder — everyone else sees who owns that choice and gets the link. Because the Drive connection is workspace‑wide, the folder picker browses the connected Google account's Drive; if that isn't your account, the workspace owner needs to reconnect Drive as the right one in Settings — connecting, reconnecting, disconnecting and the workspace's default folder are owner‑only.
Call Sheets
Turn your booked crew into a per‑day call sheet.
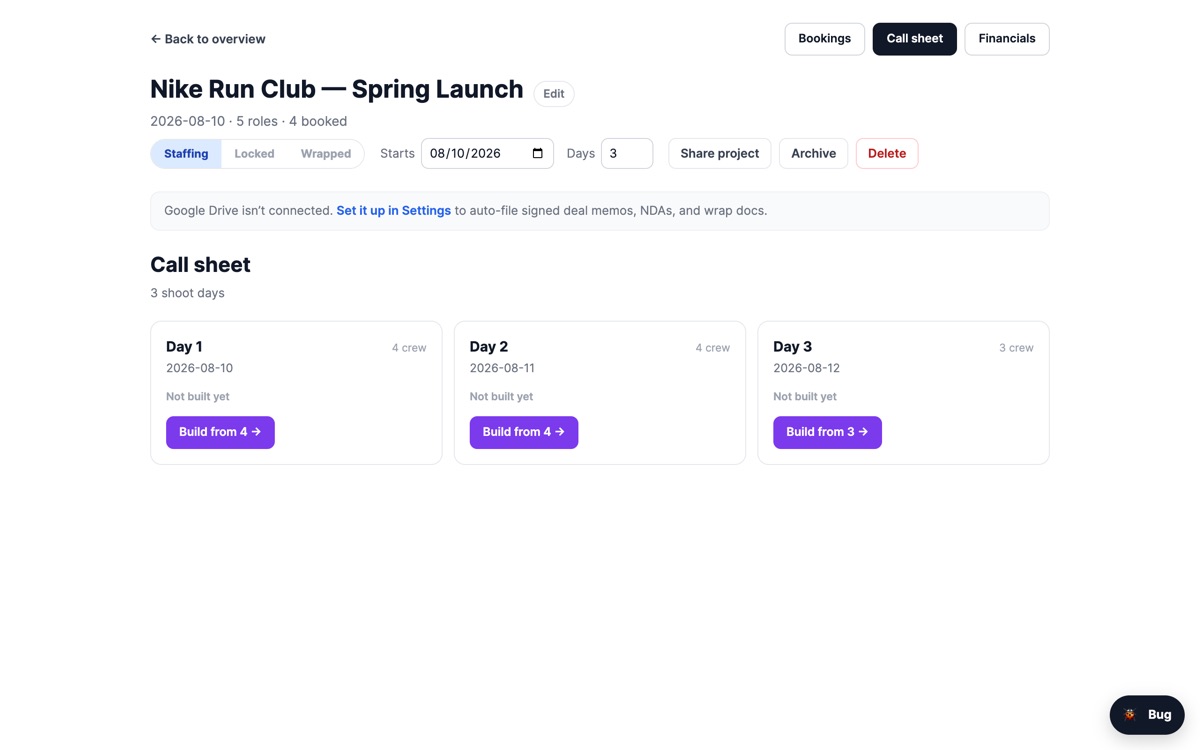
What You'll See & Do
- One Build button per shoot day — each day pulls only the crew assigned to it.
- Open the builder to lay out header, schedule, locations, departments/crew, talent, and notes.
- Apply a size template (Small / Medium / Large) to add sections without wiping your entered content — you'll get a confirm and an Undo.
- Export to PDF or share.
Heads‑up: If anyone you've booked — crew or talent — isn't on the sheet, a warning bar at the top names them, with an Add to sheet button that drops them in with one click. The reverse shows up on the day picker as Review N unbooked: crew or cast on the sheet who aren't booked, each with Add (books them, creating a roster entry if needed) or Remove. Booked crew and booked talent are added automatically when you book them, so this catches gaps (a row you deleted by hand, an edited work day, a sheet built before the booking). The reverse is fine and never flagged — someone on the sheet who isn't booked (a client, a walk‑on) is left alone. On multi‑day shoots a person is only flagged on the days they actually work.
Tip: The builder autosaves continuously and syncs live if a teammate is editing the same sheet — there's no "save" button to forget.
Finances (Across Projects)
A workspace‑wide money view, spanning every project.
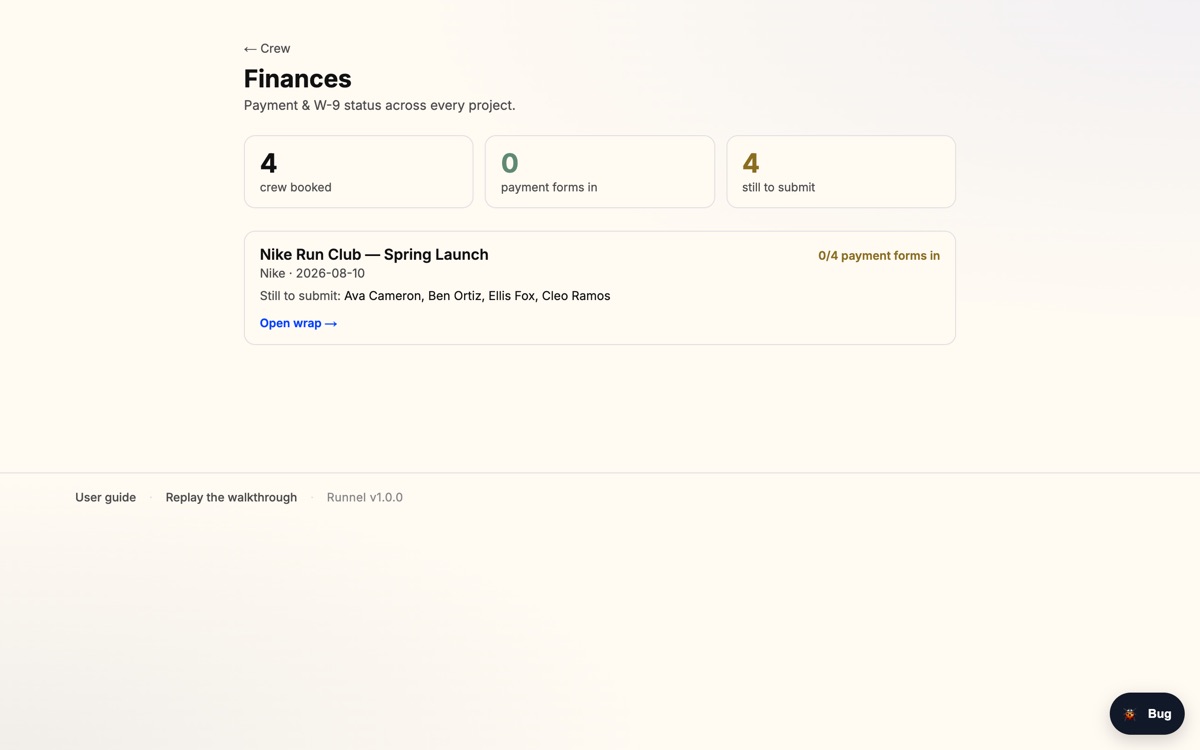
Use this to see totals and outstanding paperwork across all your productions at once, rather than project‑by‑project. Export cost report (CSV) pulls every project's booked crew and talent costs into one file — drop it into a budgeting tool (Saturation, QuickBooks, Movie Magic) or a spreadsheet. The totals, the People column and the forms count on this page include booked talent alongside crew.
Settings & Templates
Configure the workspace (most items here are admin‑only).
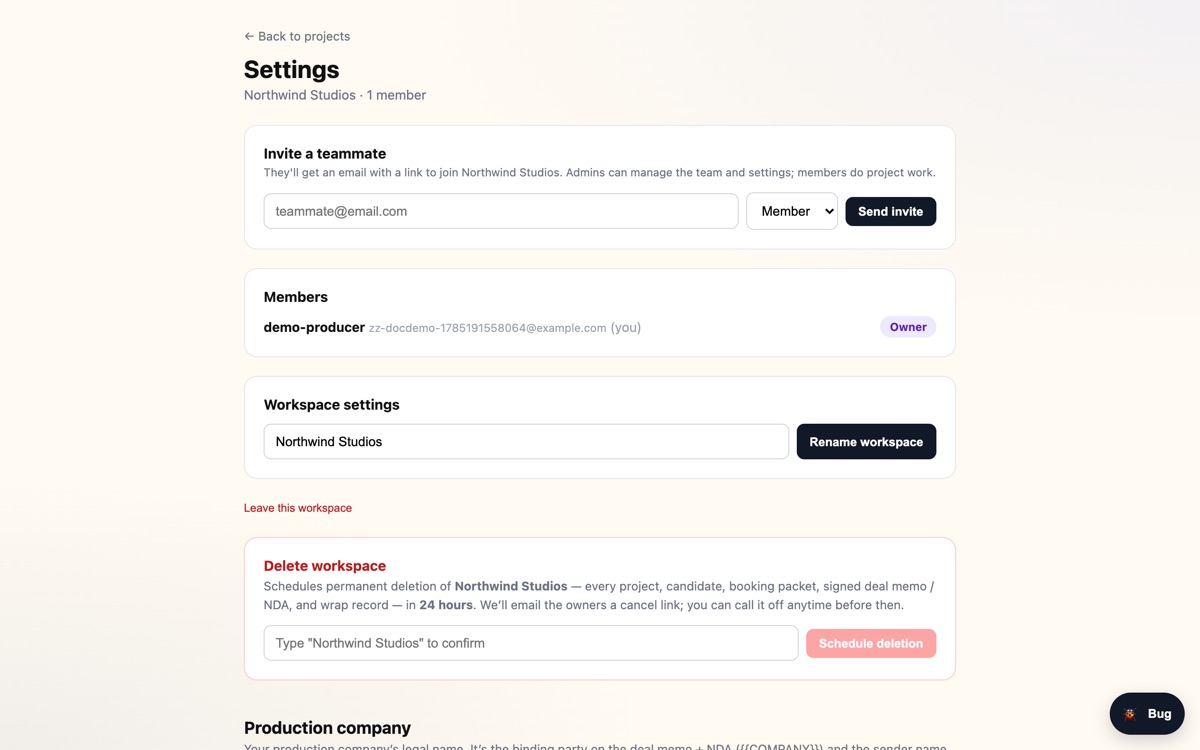
What You Can Set
- Production company legal name — required to send deal memos.
- Company address — the "bill to" printed on crew payment forms, unless a project sets its own. Not required to send anything, but without it crew won't know where to send an invoice.
- Deal memo and NDA templates — pre‑filled with a standard, editable default. Tokens like
{{PROJECT}},{{COMPANY}},{{EMPLOYEE}},{{RATE}},{{PAYMENT_TERMS}}auto‑fill from the booking; signer fields like{{LEGAL_NAME}},{{ADDRESS}},{{LOANOUT}}are filled when the crew member signs. - Email copy — the subject and body of every crew/talent email (booking packet, NDA, talent release, wrap paperwork, creative brief, and each reminder). Runnel always adds the signing button and security line, so nothing can be lost. Preview any email or send yourself a test.
- Google Drive default folder (auto‑filing).
- Members & invites — add teammates and set roles (owner / admin / member); share a single project with an outside collaborator via a link.
Tip: Every workspace keeps at least one owner — Runnel won't let you remove or demote the last one.
The End‑to‑End Workflow
Create project → Add roles → Add & book crew → Send deal memo + NDA → crew e-signs
       │                                              │
       ▼                                              ▼
  Send W-9 + payment form ──► crew submits ──► Build call sheet (per day) ──► Wrap
- Create the project (dates, days, client).
- Staff it — add roles, add candidates, book them.
- Send paperwork — deal memo + NDA to sign; W‑9 + payment form to submit.
- Publish call sheets per shoot day.
- Wrap — download signed docs, submit payment, (optionally) auto‑file to Drive, then purge sensitive data.
Reference
Crew statuses
| Status | Meaning |
|---|---|
| Considering | On your radar for a role |
| Contacted | You've reached out |
| Available | Confirmed available |
| Booked | Locked in — paperwork can be sent |
| Passed / Unavailable | Not moving forward |
Paperwork statuses
| Status | Meaning |
|---|---|
| Not sent | Nothing sent yet |
| Awaiting | Sent; waiting on the crew member |
| Signed / Submitted | Complete; document downloadable |
Rate modes
| Mode | Gross is… |
|---|---|
| Daily | rate × days worked |
| Hourly | rate × hours × days worked |
| Flat | a single fixed amount |
Roles
| Role | Can do |
|---|---|
| Owner / Admin | Everything, incl. templates, bill‑to, payment terms, archive/delete, download & purge PII. Owner only: connect / reconnect / disconnect Google Drive and its default folder; change any project's Drive folder |
| Member | Staff, book, send paperwork, build call sheets |
| Collaborator (share link) | View/help on one shared project; cannot send paperwork, erase PII, or push to Drive |
Troubleshooting
"Add this project's crew payment terms before sending." Set the project's payment terms on the Financials tab first (admin) — they're frozen onto every deal memo.
Can't send a deal memo — company name prompt. Set your production company legal name in Settings; it's printed on the memo.
The sign / W‑9 link "expired" when clicked twice. Links are one‑time and time‑limited by design — request a fresh one from the crew member's details.
A teammate can't edit templates / bill‑to. Those are admin‑only. Ask an owner/admin, or have them change the teammate's role in Settings.
Deal‑memo template looks blank in Settings. It pre‑fills with the standard default; if you'd customized it before, your version shows instead.
Generated with the app‑docs skill. Screenshots reflect a sample "Northwind Studios" workspace — no real crew data.